Make your own cookie bar with jQuery
Learn how to place cookies based on the choice of a visitor
A cookie bar to notify your visitors you are collecting cookies from various resources has been common on many websites for a while now. Even now, with the General Data Protection Regulation (GDPR) in place, many websites are lacking even this most basic feature. In this tutorial we will show you how to display a cookie bar when someone visits your website for the first time. Next, you will learn how to place a cookie when the visitor clicks the ‘accept’ button, preventing the cookie bar from popping up again and again when the visitor views different pages on your website or visits your site again in the future.
Cookie bar plugins for WordPress
As you can guess there is a plethora of plugins available that will do a pretty good job out of the box. But as is often the case: you are limited in options and every external plugin you install makes you dependent of the developer. You also create additional security threats for your website. Last but not least it never hurts to take on a little challenge to sharpen your own skills.
Step 1: Set up a development environment
This tutorial will require some editing in your WordPress theme files so make sure to make a back up of your live installation first or to do this on a local machine.
- We will use an out-of-the-box WordPress installation with the Twenty Seventeen theme.
- It’s best to use Google Chrome since we will be using its developer’s console.
Step 2: Download the cookie.js library
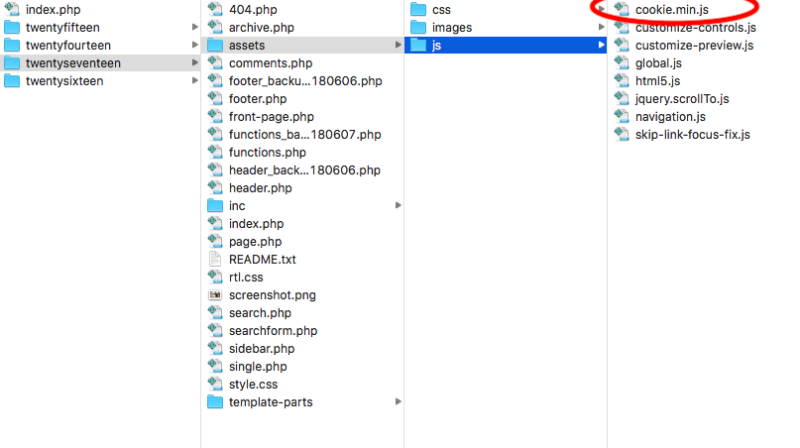
First of all you need to download the cookie.js script. From a performance point of view, it’s best to use the minified version straight away. Store the file in your theme’s folder where you keep all your JavaScript files. This is the ‘js’ folder under ‘assets’ folder. This library will take care off all the work in the background so you don’t have to dive into the code.
Step 3: The html
The cookie bar is an ordinary div-element in your website code. It’s up to you if you want to put it on top of your screen or at the bottom. In this case we will choose the footer so it won’t be too disturbing for a first-time visitor. Open your theme’s footer.php and add the following code right before the closing </body>-tag:
<div id="gdpr-box" class="cookies-accept">
<p>Lorem ipsum dolor sit amet, consectetur adipiscing elit, sed do eiusmod tempor incididunt ut labore et dolore magna aliqua.</p>
<button class="gdpr-button-accept">Accept cookies</button>
<a href="/link-to-cookie-policy" class="gdpr-button-settings">Change settings</a>
</div>
It speaks for itself you can replace the lorem ipsum with any given text. The same goes for the link to the cookie policy.
Step 4: Make it pretty with some CSS
The big advantage of coding yourself is that you can blend it in seamlessly into your website’s color scheme. This will contribute to the overall user experience. The code below will style the element. As is the case with the html code above, you can adjust the hexadecimal codes to your own liking. For this example we’ll do it quick-and-dirty. You can add the code into the <head></head>-section of the header.php file between <style></style>-tags. To do it the clean way you should add this to your general css-file of course.
#gdpr-box {
display: block;
width: 100%;
background: #000;
color: #fff;
position: fixed;
bottom: 0;
z-index: 999;
}
#gdpr-box p {
padding: 10px 20px 20px;
font-size: 12px;
line-height: 18px;
margin-top: 0;
}
#gdpr-box a {
color: #fff;
}
#gdpr-box button.gdpr-button-accept {
background: none;
color: #fff;
font-size: 12px;
}
#gdpr-box button.gdpr-button-accept,
#gdpr-box a.gdpr-button-settings {
display: inline-block;
border: 1px solid #fff;
padding: 6px 5px 4px;
text-decoration: none;
margin: 0 0 20px 20px;
border-radius: 2px;
font-weight: 800;
font-size: 12px;
-webkit-transition: all .5s;
-moz-transition: all .5s;
-o-transition: all .5s;
transition: all .5s;
}
#gdpr-box button.gdpr-button-accept:hover {
cursor: pointer;
}
#gdpr-box button.gdpr-button-accept:hover,
#gdpr-box a.gdpr-button-settings:hover {
background: #ff0000;
}
There’s a lot going on here. First we give the cookie bar a background color and a fixed position so it will always show at the bottom of the viewport regardless how much the user scrolls. We also give it a z-index to make sure the cookie bar is always displayed above other elements. The rest is pretty straightforward markup for the paragraph tag. We will display two buttons. More precisely: the button to accept the cookies is effectively a button. The button to send the visitor to the page with the cookie policy is a regular hyperlink, displayed in a similar fashion. This will present the visitor with a clear choice.
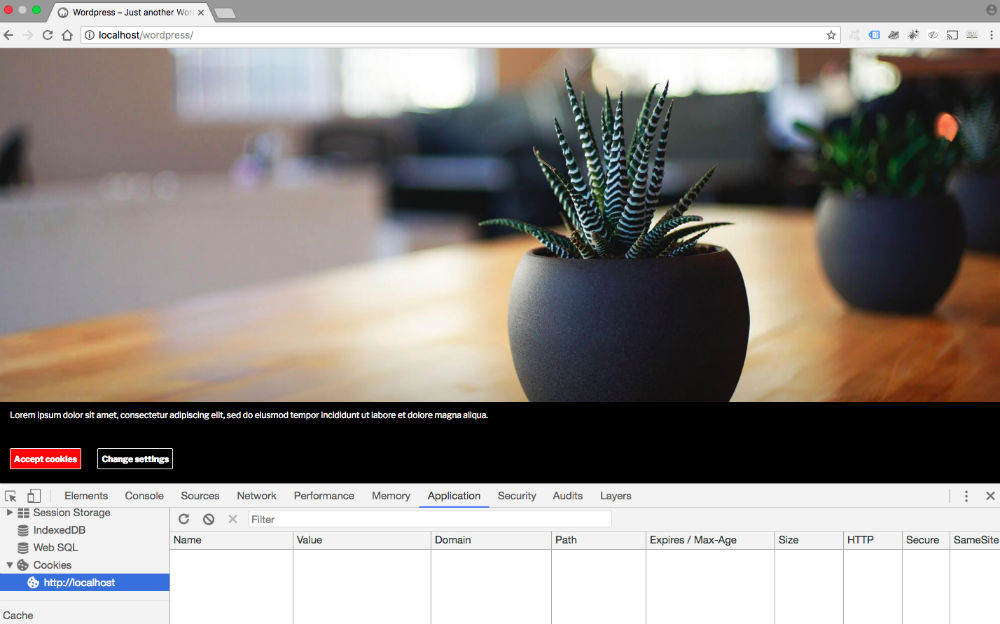
If you reload the page now you will see the cookie bar at the bottom. Scroll a little bit. The element remains in place at the bottom of your screen. Right now, there isn’t any real functionality yet. jQuery will take care of the actual magic: showing the notification on a first visit. Hide the notification if the user clicks the accept button and placing a cookie to remember his choice.
Step 5: Let jQuery do the work now
In this step we will write some javascript of our own. The script will do three things:
- It will display the cookie notification when a visitor arrives at the site for the first time
- When the visitor clicks the ‘accept’ button, we will place a cookie, valid on all pages of the website’s domain
- The cookie bar will remain hidden from then on until the visitor erases the cookies in his browser
Before we start writing our javascript code, there is one small thing you have to change to the CSS code we wrote earlier. We will put the display declaration of the #gdpr-box selector to ‘none’ instead of ‘block’:
<style>
#gdpr-box {
display: none;
...
}
We will use javascript to alter the CSS instead.
Open a new file in your favorite html editor and put in the following code:
jQuery(document).ready(function() {
// This will make the cookie bar disappear when the accept button is clicked
	jQuery('.gdpr-button-accept').click(function(){
        jQuery('#gdpr-box').fadeOut('slow');

        if (!jQuery('.cookies-accept').is()) {

			// Add the cookie. It will remain for a year
          	jQuery.cookie('cookiebar', 1, {expires: 365, path: '/'});
        	}
		return false;
    });

	// If the cookie is true, don't show the cookie bar
	if (!jQuery.cookie('cookiebar') == 1) {
		jQuery('.cookies-accept').css({'display':'block'});
	}
});
So what happens here?
- First we let the div with the cookie notification disappear when clicked. We let it fade out slowly which gives a more subtle effect.
- The following lines are the heart of this tutorial. It is here we add the cookie. First, we give it a name, in this case ‘cookiebar’. You are free to use any name you like. Next, we give it a value: 1. Here you are free to use numerical or alphanumerical values. It really doesn’t matter. However, if you use alphanumerical values, don’t forget to put them between single quotes or you will break the script. The cookie will remain in place for 365 days. The path: ‘/’ will make sure the cookie is valid on the entire domain, not just the actual page.
- In the final part we tell the browser to show the cookie notification if the cookie isn’t true. We use a reverse logic (hence the exclamation mark).
Save the file in the same folder where you saved the cookie.min.js earlier: the ‘js’ subfolder of the ‘assets’ folder. You can give the file any name you like. In this example, we’ve used ‘custom.js’.
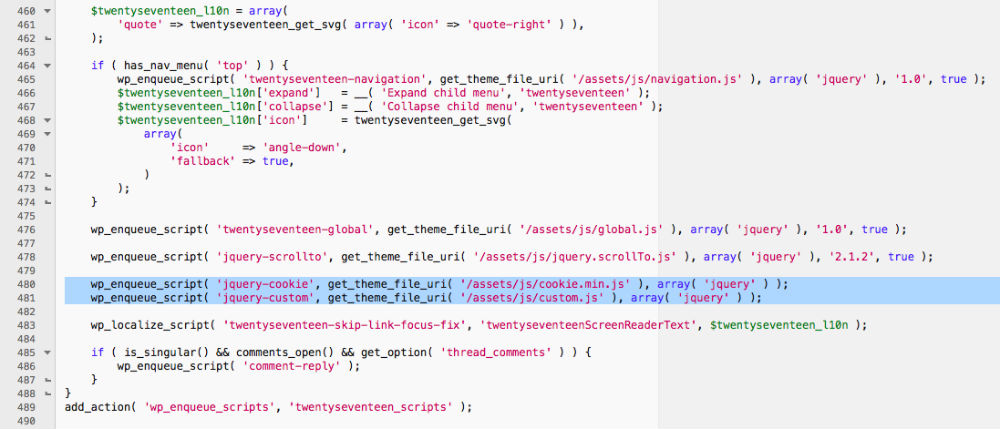
We’re almost there. Unlike the CSS we put in the header.php (just for this example) we have to make sure our cookie.min.js and custom.js files will be loaded after the main jQuery library. Thus it is important we queue the scripts properly as WordPress dictates. This requires some alterations in your functions.php file. Open the file and scroll down to rule 430. It is there that the twentyseventeen theme queues external files. Now add the following code at about rule 480:
wp_enqueue_script( 'jquery-cookie', get_theme_file_uri( '/assets/js/cookie.min.js' ), array( 'jquery' ) );
wp_enqueue_script( 'jquery-custom', get_theme_file_uri( '/assets/js/custom.js' ), array( 'jquery' ) );
It should look something like this:
All set, let’s try!
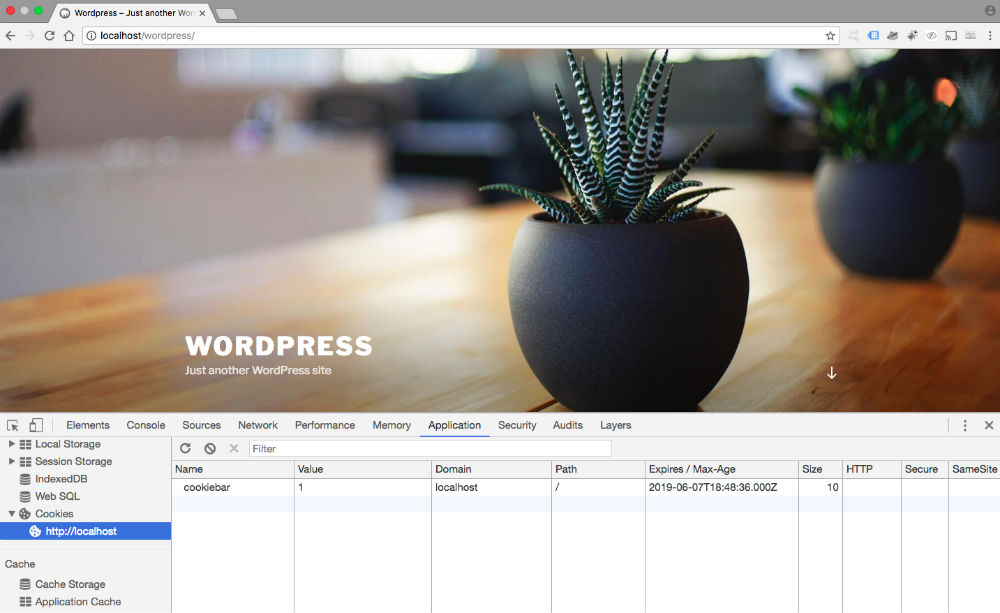
Go back to your browser and reload. The cookie bar will appear. Now click the accept button and reload again. You will now see the cookie being set in the application pane of Chrome’s developer tools.
Now do some tests: visit a couple of subpages on your site, close the browser and re-open it. You will see the cookie remains in place and the cookie bar won’t show. Clear your browser’s cookies or use an alternative browser: the cookie notification will appear again as it will be considered a first-time visit.
